Oreo Dump Cake Recipe
“`html
There is something utterly irresistible about a dessert that combines Oreo cookies, luscious layers, and simple assembly into one show-stopping sweet treat. This Oreo Dump Cake Recipe takes your favorite cookies and turns them into a moist, fudgy cake topped with creamy Cool Whip and a golden buttery crust, making it perfect for any occasion when you want an easy yet indulgent dessert. Whether you’re a seasoned baker or just someone who loves quick, delicious recipes, this no-fuss cake will soon become one of your favorite go-to desserts.
Ingredients You’ll Need
These ingredients might seem straightforward, but each one plays a crucial role in crafting the rich texture, decadent flavor, and gorgeous look of your Oreo Dump Cake. From the crunch of Oreos to the silky sweetness of condensed milk, every component comes together effortlessly.
- Oreos (20 cookies): The classic cookie adds crunch and chocolatey goodness as the cake’s base layer.
- Sweetened condensed milk (14 ounces): Provides a creamy, sweet binder that keeps the cake moist and rich.
- Cool Whip (8 ounces, thawed): Adds fluffy lightness and a smooth texture to balance the cake’s dense elements.
- Chocolate cake mix (1 box): The secret to that soft, cakey crust which contrasts perfectly with the cookies and fillings.
- Butter (¾ cup or 12 tablespoons): Cut into pats to melt evenly on top, creating a golden, luscious finish.
How to Make Oreo Dump Cake Recipe
Step 1: Prep Your Workspace
Start by preheating your oven to 350°F (175°C). Lightly grease a 9×13-inch baking dish to make sure your cake won’t stick, so it slides out easily after baking. This simple step sets a smooth foundation for all the layers to come.
Step 2: Layer the Oreos
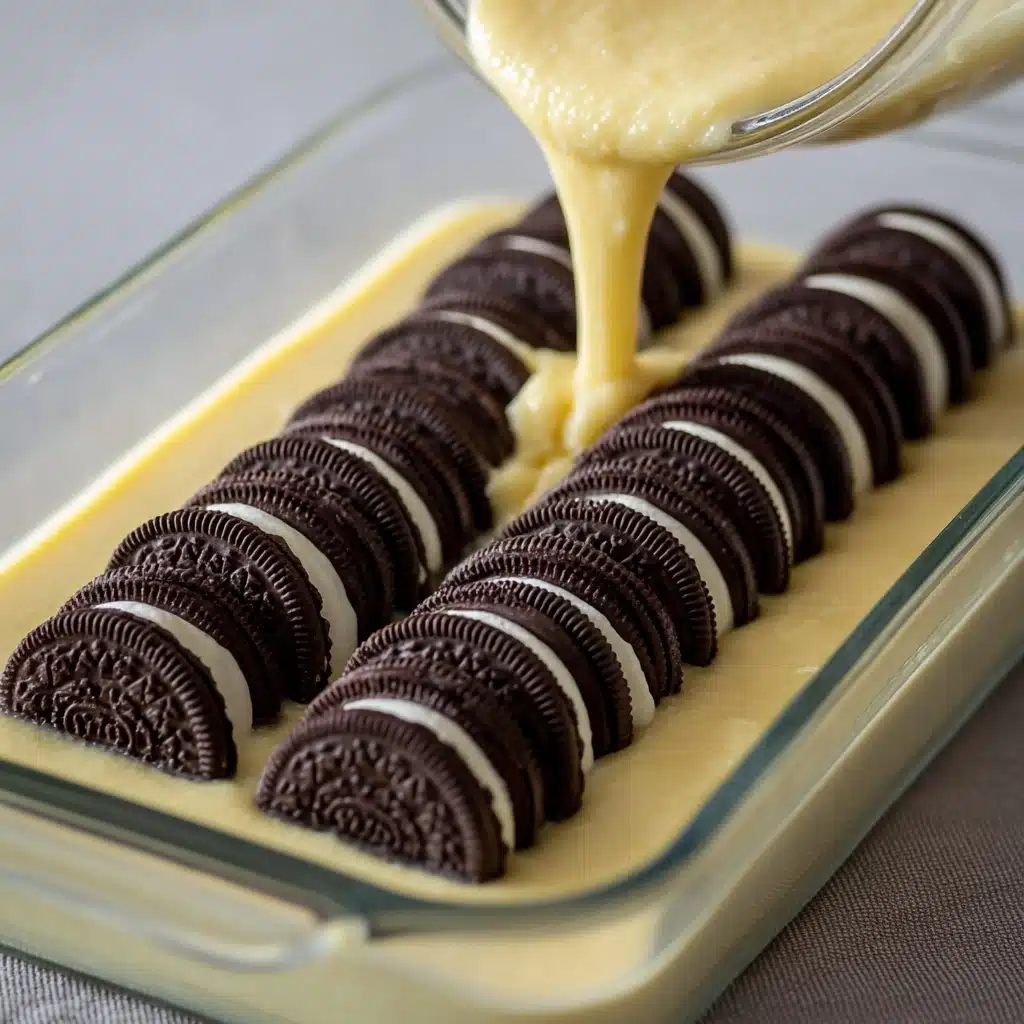
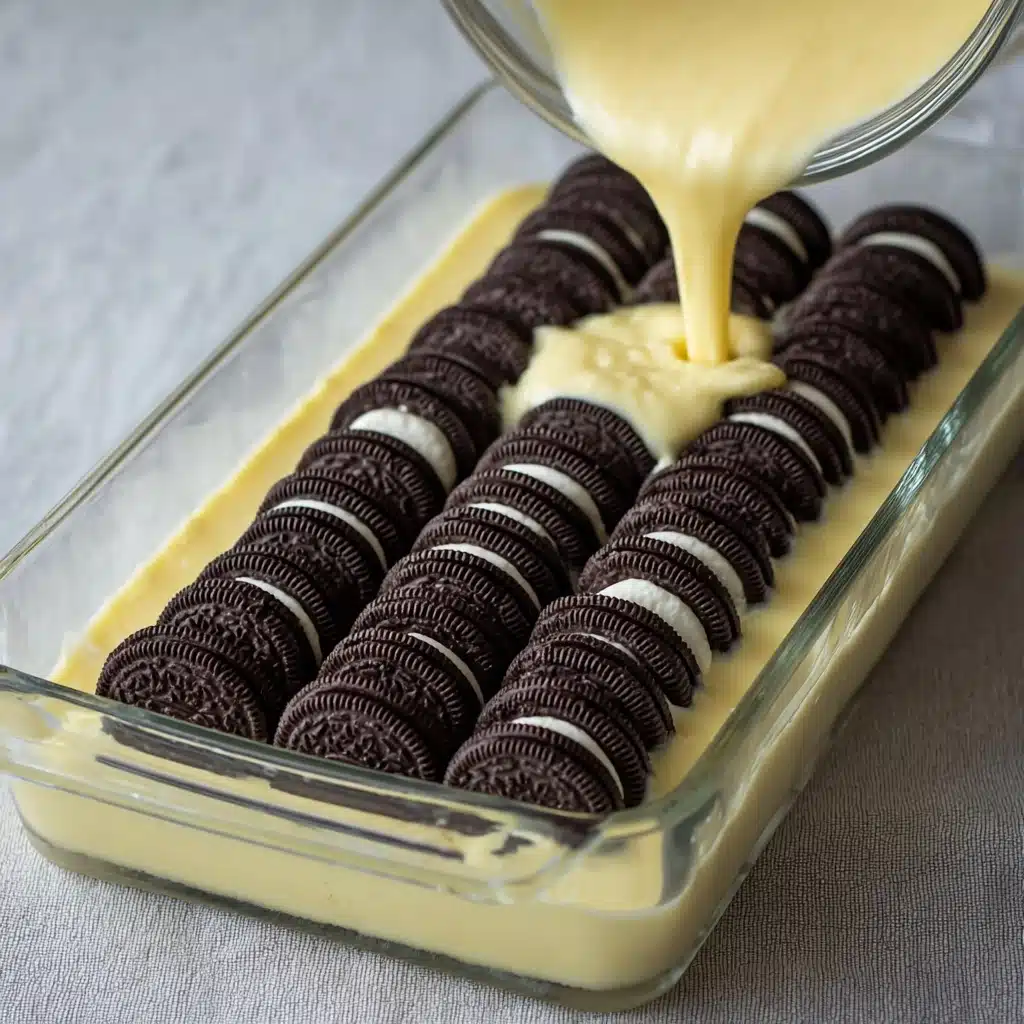
Arrange two rows of 10 Oreo cookies side by side evenly across the bottom of your baking dish. This crunchy Oreo base is what gives the dump cake its signature texture and flavor, so be sure to place them carefully for the best results.
Step 3: Pour in Sweetened Condensed Milk
Pour 14 ounces of sweetened condensed milk evenly over the Oreo cookies. This thick, sweet layer seeps into the cookies during baking, binding everything together while adding a gooey richness that’s impossible to resist.
Step 4: Spread the Cool Whip
Next, spread the thawed 8-ounce container of Cool Whip evenly over the condensed milk. This creamy layer will lighten up the dessert and create a silky smooth texture that balances the dense ingredients perfectly.
Step 5: Add the Chocolate Cake Mix
Sprinkle the entire box of chocolate cake mix evenly over the Cool Whip. Using a fork, gently rake through the mix to break up any lumps, ensuring an even and fluffy topping that crisps up beautifully in the oven.
Step 6: Top with Butter
Cut your ¾ cup of butter into small pats—about one tablespoon each—and place them evenly across the cake mix. Do not mix; these small pats will melt during baking creating pockets of buttery richness and a beautifully golden crust.
Step 7: Bake and Cool
Place your dish in the preheated oven and bake for 40 to 45 minutes. The cake is done when the top is golden and bubbling around the edges. Allow it to cool slightly before serving, so the layers settle and it’s easier to slice. Get ready for some serious compliments!
How to Serve Oreo Dump Cake Recipe
Garnishes
While the cake is fantastic on its own, a few thoughtful garnishes can elevate it even further. Top with crushed Oreo crumbs for extra crunch, a dollop of whipped cream for added creaminess, or a drizzle of chocolate syrup to intensify the chocolate flavor. Fresh berries like raspberries can add a refreshing burst of tartness that contrasts beautifully with the sweetness.
Side Dishes
Oreo Dump Cake pairs wonderfully with simple sides such as a scoop of vanilla ice cream, which melts into the warm cake for a heavenly combination. For a more adult twist, serve it alongside a cup of rich coffee or a glass of cold milk to balance the richness. Light fruit salads also work well to refresh the palate between bites.
Creative Ways to Present
This Oreo Dump Cake Recipe is versatile and can be served in various fun presentations. Try layering it into parfait glasses with alternating whipped cream and crushed Oreos for an elegant look. Or serve it in individual ramekins to make personalized desserts. For parties, cut it into bite-sized bars and arrange them on a colorful platter to invite everyone to indulge.
Make Ahead and Storage
Storing Leftovers
If you have any leftovers (though that’s rare!), cover the cake tightly with plastic wrap or store in an airtight container in the refrigerator for up to 4 days. Chilling allows the flavors to meld even more, sometimes making it taste even better the next day.
Freezing
You can freeze the Oreo Dump Cake Recipe if you want to save some for later. Wrap tightly in plastic wrap and then aluminum foil to prevent freezer burn. Freeze for up to 2 months. Thaw overnight in the refrigerator before serving, and gently reheat if desired.
Reheating
To reheat, warm individual slices in the microwave for 20-30 seconds or place the whole cake in a low oven at 300°F for about 10 minutes. Just enough to bring back that fresh-baked warmth without drying it out. Serve warm or at room temperature for the best taste.
FAQs
Can I use other cookies instead of Oreos?
Absolutely! While Oreos give this cake its classic flavor, you can experiment with other chocolate sandwich cookies or even chocolate chip cookies. Just be mindful that the texture and sweetness may vary slightly.
Do I have to use Cool Whip or can I substitute?
Cool Whip works great because of its light texture, but you can substitute with whipped cream or even mascarpone for a richer twist. Just make sure whatever you use is spreadable and not too dense.
Is it okay to skip the butter on top?
Butter is key to getting that golden, crispy top layer, so skipping it might result in a less textured finish. If you want to reduce butter, try adding a bit but expect a different crust texture.
How long does this cake keep well?
This cake is best enjoyed within 4 days when stored in the refrigerator. The flavors develop beautifully, but after that, the texture may start to degrade.
Can I make this recipe gluten-free?
To make it gluten-free, look for gluten-free chocolate cake mix and gluten-free Oreo alternatives. Ensure that other ingredients like Cool Whip and condensed milk are gluten-free too, and you’re good to go!
Final Thoughts
If you’re craving a dessert that feels like a comforting hug but doesn’t require hours in the kitchen, this Oreo Dump Cake Recipe is the perfect answer. Easy to assemble, endlessly delicious, and endlessly lovable, it’s sure to earn a permanent spot in your recipe collection. So go on, treat yourself and your loved ones to this delightful dessert—you’ll thank me later!
“`
PrintOreo Dump Cake Recipe

This Oreo Dump Cake is an incredibly easy and delicious layered dessert combining the classic flavors of Oreo cookies, sweetened condensed milk, creamy Cool Whip, rich chocolate cake mix, and buttery topping. Perfect for a quick indulgent treat with minimal effort required.
- Prep Time: 10 minutes
- Cook Time: 45 minutes
- Total Time: 55 minutes
- Yield: 12 servings 1x
- Category: Dessert
- Method: Baking
- Cuisine: American
- Diet: Vegetarian
Ingredients
Oreo Layer
- 20 Oreo cookies
Wet Ingredients
- 14 ounces sweetened condensed milk (1 can)
- 1 container (8 ounces) Cool Whip, thawed
Dry Ingredients
- 1 box chocolate cake mix (approximately 15.25 ounces)
Butter
- 3/4 cup (1 1/2 sticks or 12 tablespoons) butter, cut into small pats
Instructions
- Preheat and Prepare Dish: Preheat your oven to 350°F (175°C) and lightly grease a 9×13 inch baking dish with butter or non-stick cooking spray to prevent sticking.
- Layer Oreos: Place 20 Oreo cookies in two even layers across the base of the prepared dish, arranging them side by side to cover the entire surface.
- Add Sweetened Condensed Milk: Pour all 14 ounces of sweetened condensed milk evenly over the Oreo cookies, allowing the milk to seep between the cookies.
- Spread Cool Whip: Using a spatula, spread the thawed 8-ounce container of Cool Whip evenly over the sweetened condensed milk layer.
- Top with Cake Mix: Sprinkle the entire box of chocolate cake mix evenly over the Cool Whip layer. Use a fork to gently rake through the dry mix to break up any lumps and create a uniform surface.
- Add Butter: Cut the 3/4 cup butter into small 1-tablespoon pats or smaller pieces. Distribute the pieces evenly across the top of the cake mix layer to cover as much surface as possible. Do not stir or mix.
- Bake: Place the baking dish in the preheated oven and bake for 40-45 minutes, or until the butter is melted and the top is golden and baked through.
- Cool and Serve: Remove the dump cake from the oven and allow it to cool slightly before serving. This will help it set and makes it easier to slice.
Notes
- You can substitute regular Cool Whip with a dairy-free or vegan whipped topping if desired.
- The cake is best served slightly warm but remains delicious at room temperature or chilled.
- Do not stir the ingredients after assembling; the layering effect is key to the texture and flavor.
- For a nuttier twist, sprinkle chopped nuts on top of the cake mix before adding butter.
- Storage: Store leftovers covered in the refrigerator for up to 3 days and reheat gently before serving.
Nutrition
- Serving Size: 1 slice (1/12 of cake)
- Calories: 450 kcal
- Sugar: 38 g
- Sodium: 290 mg
- Fat: 24 g
- Saturated Fat: 14 g
- Unsaturated Fat: 8 g
- Trans Fat: 0.5 g
- Carbohydrates: 56 g
- Fiber: 2 g
- Protein: 4 g
- Cholesterol: 45 mg
Keywords: Oreo dump cake, easy dessert, layered cake, chocolate cake recipe, no mixer dessert, quick dessert recipe