Chocolate Cherry Cream Pie Recipe
Introduction
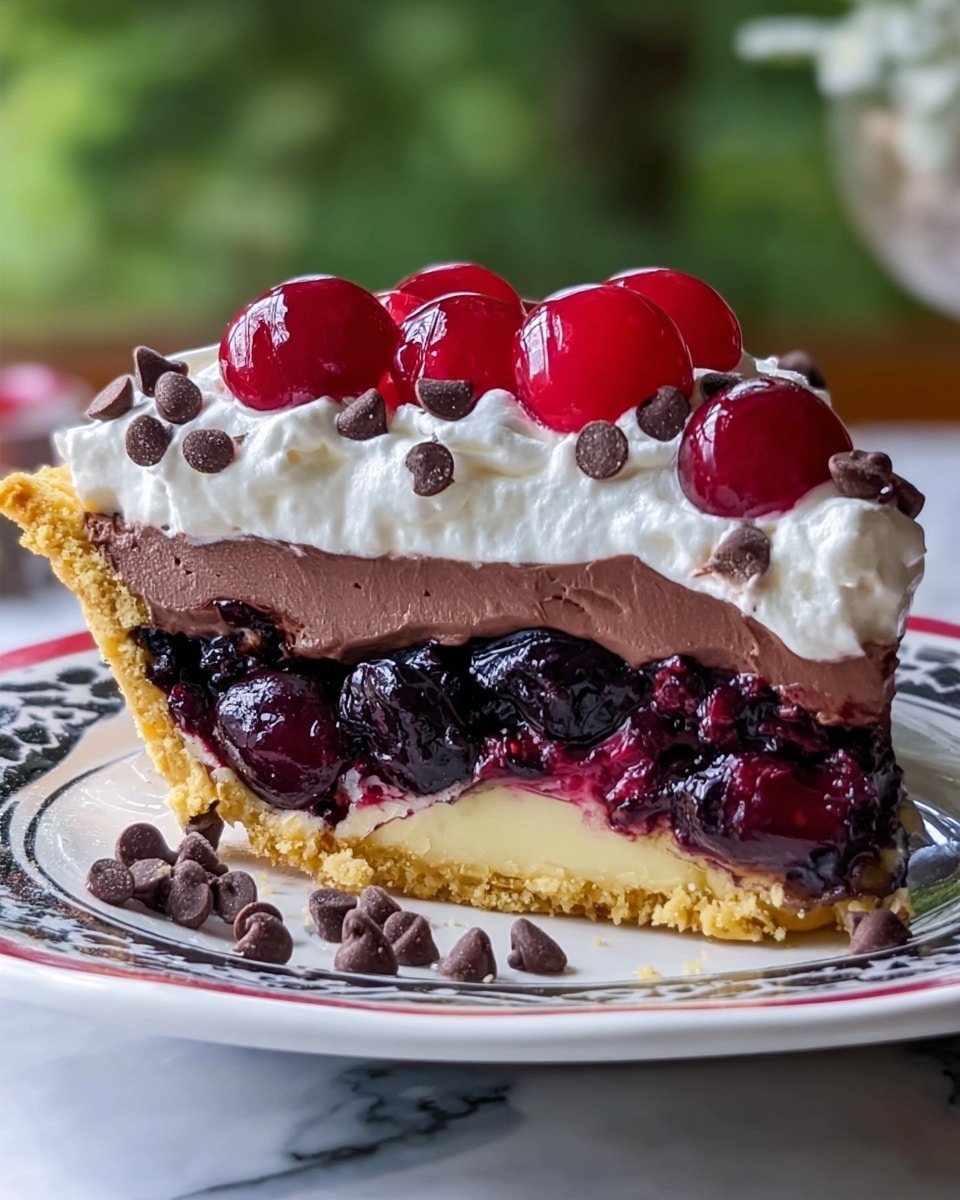
Chocolate Cherry Cream Pie is a luscious dessert that combines a sweet cherry base with rich chocolate pudding and fluffy whipped cream. This no-bake pie is perfect for any occasion when you want to impress with minimal effort and maximum flavor.

Ingredients
- 1 pre-baked 9-inch pie crust
- 1 can (21 oz) cherry pie filling (or homemade)
- 1 box (3.9 oz) chocolate pudding mix
- 2 cups cold milk (for pudding mix)
- 1 ½ cups whipped cream (homemade or store-bought)
- ½ cup chocolate chips (semi-sweet or dark)
- Fresh cherries for garnish (optional)
Instructions
- Step 1: Ensure the pie crust is pre-baked and fully cooled before assembling.
- Step 2: Spread the cherry pie filling evenly across the bottom of the crust.
- Step 3: Prepare the chocolate pudding according to the package instructions using cold milk. Let it thicken slightly, then spread it over the cherry layer.
- Step 4: Gently spread whipped cream over the chocolate layer, creating a smooth, even topping.
- Step 5: Sprinkle chocolate chips over the whipped cream, and add fresh cherries for extra flavor and presentation.
- Step 6: Chill the pie in the refrigerator for at least 2 hours to allow the layers to set.
- Step 7: Slice and serve chilled for a rich and creamy chocolate-cherry treat!
Tips & Variations
- Use homemade cherry pie filling for a fresher, less sweet flavor.
- Substitute whipped cream with mascarpone for a richer texture.
- Try topping with toasted almonds or crushed cookies for added crunch.
- For an adult twist, add a splash of cherry liqueur to the pudding mixture before chilling.
Storage
Store the pie covered in the refrigerator for up to 3 days. Keep it chilled until serving to maintain the creamy layers. Leftover slices can be reheated slightly at room temperature, but it’s best enjoyed cold.
How to Serve
Serve this delicious recipe with your favorite sides.
FAQs
Can I use fresh cherries instead of canned pie filling?
Yes, you can use fresh cherries by cooking them down with sugar and a little cornstarch to thicken, creating your own pie filling. This allows control over sweetness and freshness.
Is it possible to make this pie gluten-free?
Absolutely. Use a gluten-free pre-baked pie crust and double-check all other ingredients for gluten-free labels, especially the pie filling and pudding mix.
PrintChocolate Cherry Cream Pie Recipe

This Chocolate Cherry Cream Pie features a pre-baked pie crust layered with luscious cherry pie filling, rich chocolate pudding, and a fluffy whipped cream topping. Garnished with chocolate chips and fresh cherries, this no-bake dessert is perfect for chocolate and fruit lovers looking for a quick yet indulgent treat.
- Prep Time: 15 minutes
- Cook Time: 0 minutes
- Total Time: 2 hours 15 minutes
- Yield: 8 servings 1x
- Category: Dessert
- Method: No-Cook
- Cuisine: American
Ingredients
Pie Base
- 1 pre-baked 9-inch pie crust
Filling
- 1 can (21 oz) cherry pie filling (or homemade)
- 1 box (3.9 oz) chocolate pudding mix
- 2 cups cold milk
Topping
- 1 ½ cups whipped cream (homemade or store-bought)
- ½ cup chocolate chips (semi-sweet or dark)
- Fresh cherries for garnish (optional)
Instructions
- Prepare Pie Crust: Ensure the 9-inch pie crust is fully pre-baked and completely cooled before assembling the pie to maintain a crisp texture.
- Layer Cherry Filling: Spread the cherry pie filling evenly across the bottom of the cooled pie crust to create a flavorful fruit base.
- Make Chocolate Pudding: Prepare the chocolate pudding by combining the pudding mix with 2 cups cold milk according to the package instructions. Allow it to thicken slightly before use.
- Assemble Pudding Layer: Spread the thickened chocolate pudding over the cherry filling layer evenly to create a rich chocolate layer.
- Add Whipped Cream: Gently spoon and spread the whipped cream over the chocolate pudding layer, smoothing it out to form a creamy topping.
- Garnish: Sprinkle chocolate chips on top of the whipped cream and add fresh cherries for added flavor and presentation if desired.
- Chill: Refrigerate the pie for at least 2 hours to allow the layers to set properly for ease of slicing and serving.
- Serve: Slice the chilled pie and serve immediately for a refreshing, decadent dessert experience.
Notes
- Use a pre-baked pie crust to avoid sogginess and save time.
- For homemade cherry filling, use fresh or frozen cherries cooked with sugar and a thickener like cornstarch.
- Whipped cream can be homemade using heavy cream and sugar or store-bought for convenience.
- Chilling is essential for the pudding to set and the flavors to meld together.
- Optional garnishes like chocolate shavings or mint leaves can also be used for extra flair.
Keywords: Chocolate Cherry Cream Pie, no-bake pie, cherry pie filling, chocolate pudding dessert, whipped cream pie