Chocolate Mint Thumbprint Cookies Recipe
Introduction
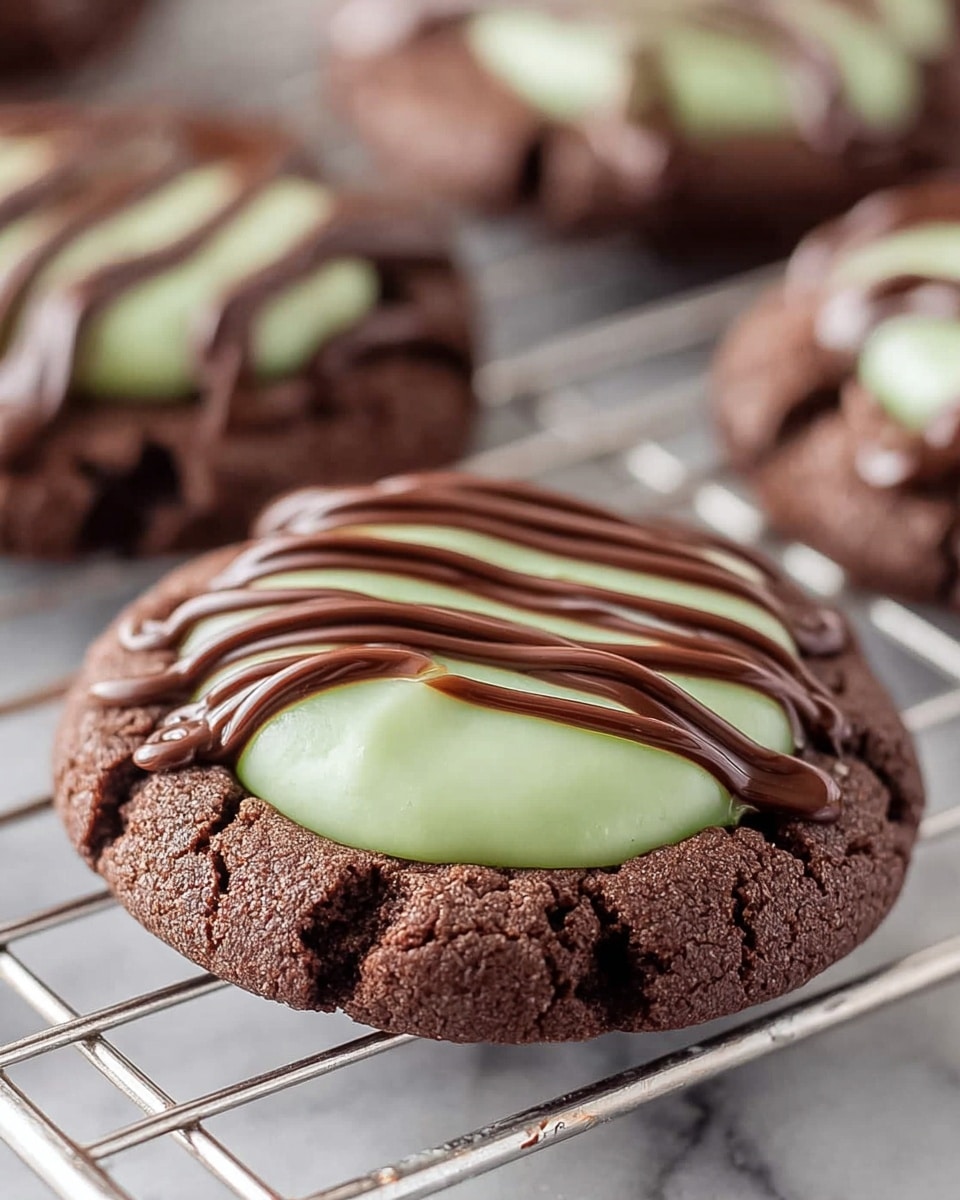
These Chocolate Mint Thumbprint Cookies combine rich cocoa with a creamy white chocolate mint center for a festive and indulgent treat. Perfect for holiday gatherings or as a delightful dessert any time of year.

Ingredients
- 1 cup butter (room temperature)
- 2 cups white sugar
- 2 eggs
- 2 teaspoons vanilla extract
- 3 cups all-purpose flour
- 1 cup unsweetened cocoa powder
- ½ teaspoon salt
- ½ teaspoon baking soda
- ½ teaspoon baking powder
- 2 ounces chocolate almond bark
- 1 ½ cups white chocolate chips
- ½ of 14 oz can sweetened condensed milk
- ½ teaspoon mint extract
- Green food coloring
Instructions
- Step 1: In a large mixing bowl, cream the butter and sugar together until light and fluffy. Mix in the eggs one at a time, then add vanilla extract and blend until combined. Add cocoa powder, salt, baking soda, baking powder, and flour, mixing until fully incorporated.
- Step 2: Roll the dough into 1-inch balls and place them on a greased or parchment-lined baking sheet. Use your thumb to press a well into the center of each dough ball to create the thumbprint.
- Step 3: Bake cookies at 350°F (175°C) for 12 minutes. If the thumbprint indentations fade during baking, gently press them down again with the back of a wooden spoon or spatula. Allow cookies to cool on the baking sheet for 2 minutes, then transfer to a wire rack to cool completely.
- Step 4: For the filling, melt the white chocolate chips and half a can of sweetened condensed milk together in a small saucepan over medium heat, stirring continuously. Stir in the mint extract and a few drops of green food coloring until you reach your desired shade.
- Step 5: Spoon the mint fudge mixture into the thumbprint wells of each cookie.
- Step 6: Melt the chocolate almond bark according to package directions and drizzle it over the filled cookies. Let the chocolate set before serving or storing.
Tips & Variations
- For a stronger mint flavor, increase the mint extract gradually but be careful not to overpower the chocolate.
- Use dark or semi-sweet chocolate almond bark for a richer drizzle.
- If you prefer a softer cookie, reduce baking time by 1-2 minutes.
- To make these gluten-free, substitute the all-purpose flour with a gluten-free baking blend.
Storage
Store the cookies in an airtight container at room temperature for up to 5 days. For longer storage, refrigerate up to 2 weeks or freeze for up to 3 months. Allow cookies to come to room temperature before serving; you can lightly rewarm them in the oven for a few minutes if desired.
How to Serve
Serve this delicious recipe with your favorite sides.
FAQs
Can I use regular chocolate instead of almond bark?
Yes, you can substitute regular chocolate chips or bars for the almond bark. Just melt gently to avoid burning and ensure a smooth drizzle.
What if I don’t have mint extract?
If you don’t have mint extract, you can skip it or use a small amount of peppermint oil or a crushed mint candy to flavor the filling. Adjust to taste and be cautious as peppermint oil is very potent.
PrintChocolate Mint Thumbprint Cookies Recipe

Delight in these rich and festive Chocolate Mint Thumbprint Cookies featuring a soft cocoa cookie base, filled with a creamy mint-infused white chocolate fudge center, and finished with a drizzle of melted chocolate almond bark. Perfectly balanced with a hint of mint and a luscious texture, these cookies make a delightful treat for the holidays or any special occasion.
- Prep Time: 20 minutes
- Cook Time: 12 minutes
- Total Time: 45 minutes
- Yield: Approximately 30 cookies 1x
- Category: Dessert
- Method: Baking
- Cuisine: American
Ingredients
Cookie Dough
- 1 cup butter (room temperature)
- 2 cups white sugar
- 2 eggs
- 2 teaspoons vanilla extract
- 3 cups all-purpose flour
- 1 cup unsweetened cocoa powder
- ½ teaspoon salt
- ½ teaspoon baking soda
- ½ teaspoon baking powder
Fudge Filling
- 1 ½ cups white chocolate chips
- ½ of 14 oz can sweetened condensed milk (7 oz)
- ½ teaspoon mint extract
- Green food coloring (optional, to tint the fudge)
Chocolate Drizzle
- 2 ounces chocolate almond bark (Candiquik)
Instructions
- Prepare the Cookie Dough: In a large mixing bowl, cream the softened butter and white sugar together until the mixture is light and fluffy. Beat in the eggs one at a time, ensuring each is fully incorporated before adding the next. Stir in the vanilla extract. Then, gradually add the unsweetened cocoa powder, salt, baking soda, baking powder, and all-purpose flour. Mix until a uniform cookie dough is formed.
- Shape the Cookies: Roll the dough into 1-inch diameter balls and place them evenly spaced on a greased baking sheet or one lined with parchment paper. Using your thumb, gently press into the center of each cookie ball to create a shallow well. This indentation will hold the fudge filling later.
- Bake the Cookies: Preheat your oven to 350°F (175°C). Bake the cookies for about 12 minutes. If the thumbprint indents disappear during baking, gently press the centers again with the back of a wooden spoon or spatula to reform the wells. Allow the cookies to cool on the baking sheet for 2 minutes before transferring them to a wire rack to cool completely.
- Make the Fudge Filling: In a small saucepan over medium heat, melt together the white chocolate chips and half of the sweetened condensed milk, stirring continuously to prevent burning and to achieve a smooth consistency. Once melted, remove from heat and stir in the mint extract and a few drops of green food coloring if desired to enhance the minty appearance.
- Fill the Cookies: Use a spoon to carefully fill each cookie’s thumbprint well with the prepared mint fudge filling. Ensure the filling sits nicely in the indent without overflowing.
- Prepare the Drizzle: Melt the chocolate almond bark according to the package instructions to achieve a smooth and pourable consistency. Drizzle the melted chocolate over the top of the filled cookies using a spoon or fork for an elegant finish.
- Set and Serve: Allow the chocolate drizzle to set at room temperature. Once set, serve the cookies immediately or store them in an airtight container to maintain freshness.
Notes
- For a stronger mint flavor, you can increase the mint extract slightly, but be cautious as it can overpower the other flavors.
- If green food coloring is unavailable, the mint fudge filling can be served without it, still tasting delicious.
- Make sure to cool the cookies completely before filling to prevent the fudge from melting or mixing into the cookie base.
- Use parchment paper on your baking sheets for easier cleanup and to prevent sticking.
- Store cookies in an airtight container at room temperature for up to 5 days or refrigerate for longer freshness.
Keywords: chocolate mint cookies, thumbprint cookies, mint fudge cookies, holiday cookies, white chocolate filling