Jellycat Birthday Cake Recipe

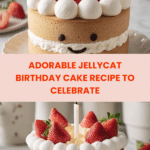
This Jellycat Birthday Cake is a delightful and visually charming layered cake featuring moist vanilla sponge layers, whipped cream, and strawberry jam filling. Decorated with fresh strawberries, piped vanilla and chocolate whipped cream, and a sweet chocolate face, this cake is perfect for birthdays and special celebrations. The recipe combines a light, airy cake with creamy whipped layers and a touch of fruity jam for a balanced, festive dessert.
- Prep Time: 20 minutes
- Cook Time: 40 minutes
- Total Time: 1 hour 10 minutes
- Yield: 8 servings 1x
- Category: Dessert
- Method: Baking
- Cuisine: Western
Ingredients
Scale
Cake Layers
- 225 g all-purpose flour
- 1 1/2 teaspoons baking powder
- 1/2 teaspoon salt
- 3 large eggs (room temperature)
- 225 g granulated sugar
- 85 g unsalted butter
- 190 g milk (dairy or non-dairy)
- 2 tablespoons oil
- 1 1/2 teaspoons vanilla extract
Whipped Cream and Decoration
- 300 g whipping cream or heavy cream (cold)
- 30 g powdered sugar
- 1 teaspoon vanilla extract
- 1–2 teaspoons cocoa powder
- 4 tablespoons strawberry jam (store-bought or homemade)
- 2–3 fresh strawberries (halved)
- 1 birthday candle (white and red stripes preferred)
- 20 g dark chocolate (roughly chopped)
Instructions
- Preheat and prepare pans: Preheat your oven to 350°F (175°C). Line two 6-inch round cake pans with parchment paper rounds on the bottom to prevent sticking and set them aside.
- Mix dry ingredients: In a small bowl, mix together the all-purpose flour, baking powder, and salt. Set aside for later use.
- Heat wet ingredients: In a small pot or microwave-safe bowl, combine the butter, milk, oil, and vanilla extract. Warm the mixture on the stovetop or in the microwave just until the butter melts. Avoid boiling. Keep the mixture covered and warm while preparing the batter.
- Beat eggs and sugar: In a large mixing bowl, add the eggs and granulated sugar. Using an electric hand mixer with a whisk attachment, beat on medium speed for 6 minutes until the mixture triples in size and becomes pale and almost white in color, creating a light and airy base.
- Combine flour and eggs: Add half of the flour mixture into the egg mixture and mix on low speed until barely combined. Then add the remaining flour mixture and mix until mostly combined, leaving some flour patches to avoid overmixing.
- Add warm milk mixture: Slowly stream the warm milk mixture into the batter while mixing on low speed, continuing until the batter is smooth and fluid.
- Fill pans and bake: Divide the batter evenly between the prepared cake pans, filling each about halfway. Bake for 35-40 minutes, or until a toothpick inserted in the center comes out with just a few moist crumbs.
- Cool cakes: Allow the cakes to cool in the pans for about 15 minutes. Then run an offset spatula around the edges, release the cakes, and transfer them to wire racks to cool completely.
- Prepare whipped cream: In a large bowl, add the cold whipping cream, powdered sugar, and vanilla extract. Beat with an electric mixer fitted with a whisk attachment until soft peaks form. Remove a small portion of the whipped cream to a separate bowl.
- Make chocolate whipped cream: Stir cocoa powder into the small portion of whipped cream until evenly tinted brown. Transfer this chocolate cream to a small piping bag and set aside.
- Fill piping bags: Place both the vanilla whipped cream and chocolate whipped cream into separate piping bags with the tips cut off for easy piping.
- Assemble cake bottom layer: Place one cake layer on a serving plate or cake board. Pipe dollops of vanilla whipped cream along the edge, smoothing the tails toward the center with a spatula.
- Add strawberry jam: Spread the strawberry jam evenly in the middle section of the bottom cake layer without disturbing the piped whipped cream edges.
- Top with second cake layer: Place the second cake layer on top of the jam and pipe more vanilla whipped cream dollops on the surface.
- Decorate with strawberries and candle: Arrange halved fresh strawberries on top of the piped whipped cream. Insert the birthday candle into the center of the cake.
- Pipe chocolate legs: Using the chocolate whipped cream, pipe little legs extending from around the bottom cake layer onto the plate, creating a cute Jellycat-inspired design.
- Create chocolate face: Melt the chopped dark chocolate in the microwave or on the stovetop until smooth. Transfer to a small piping bag, snip the tip, and pipe eyes and a smile on the bottom cake layer between the chocolate legs, completing the decorative face.
Notes
- Using room temperature eggs helps in achieving better volume when beating.
- Do not overmix the batter once the flour is added to keep the cake tender and light.
- Keep the whipping cream very cold for easier whipping to stiff peaks.
- You can use dairy or non-dairy milk and cream as desired for dietary preferences.
- The cake pans used are 6 inches in diameter for proportionate layers.
- Melt chocolate carefully to avoid burning; use low heat and stir frequently.
- This cake is best served the same day but can be refrigerated for up to 2 days.
Keywords: birthday cake, layered cake, whipped cream cake, strawberry jam cake, Jellycat cake, chocolate decoration, vanilla sponge cake
Find it online: https://victoriablair.com/jellycat-birthday-cake-recipe/