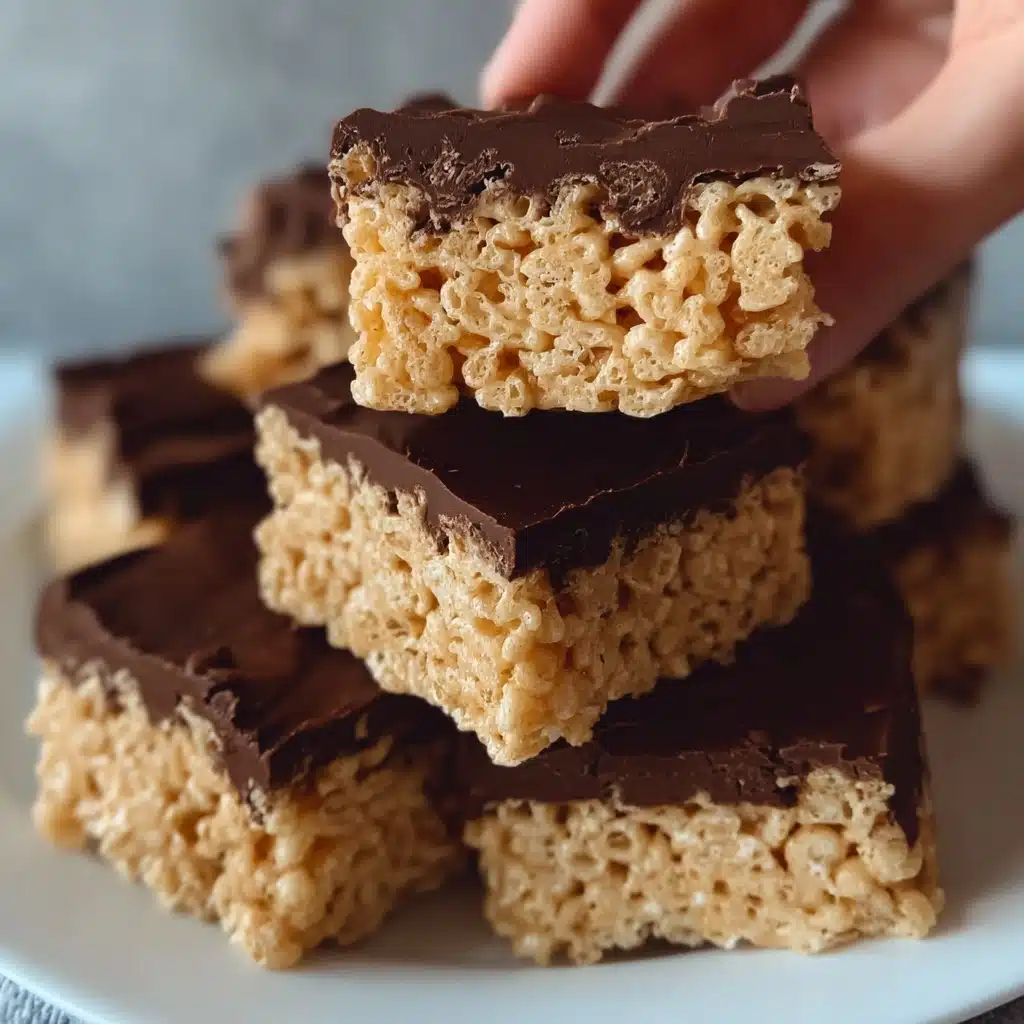
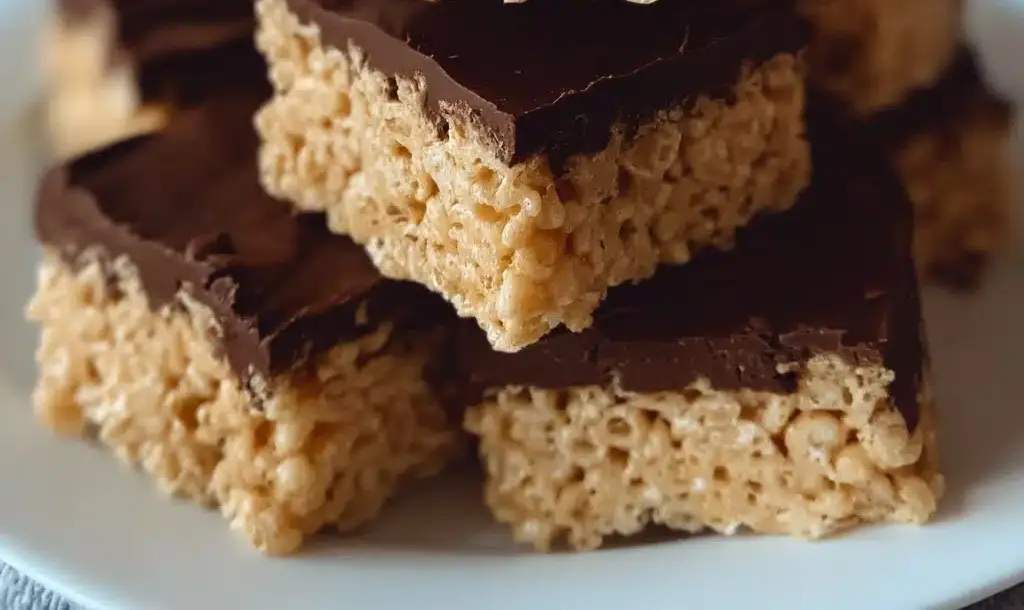
Oh Henry Bars Recipe
If you adore snacks that combine crispy crunch, creamy peanut butter, and rich chocolate, then these Oh Henry Bars are about to become your new obsession. This recipe takes the nostalgic flavors inspired by the classic candy bar and transforms them into a homemade treat that’s irresistibly chewy, chocolaty, and perfectly nutty. Every bite offers that delightful blend of textures and sweetness that makes these bars such a crowd-pleaser. Whether you’re making them for a quick snack or a party dessert, Oh Henry Bars deliver a comforting and indulgent experience that’s hard to beat.
Ingredients You’ll Need
Don’t let the simplicity fool you—each ingredient plays a crucial role in making these Oh Henry Bars truly shine. From the smooth peanut butter that adds creaminess and a nutty depth, to the gluten-free rice krispies providing airy crunch, every component has a delicious purpose.
- ¾ cup granulated sugar: Sweetens the bars and helps create a soft caramel-like base when combined with syrup.
- 1 cup white Karo syrup: Acts as a sticky binder, giving the bars that perfect chewy texture.
- 1 cup creamy peanut butter: Adds rich, nutty flavor and creaminess that balances the crunchy cereal.
- 6 cups gluten free rice krispie cereal: Provides lightness and a satisfying crunch; be sure to choose a trusted brand that stays crisp.
- 20 ounces Enjoy Life semi-sweet chocolate chips: These add a decadent chocolate layer on top, bringing everything together in sweet harmony.
How to Make Oh Henry Bars
Step 1: Create the Peanut Butter Syrup Mixture
Start by heating the granulated sugar and Karo syrup in a saucepan until it reaches a gentle boil. This hot mixture is essential because it melts the sugar just enough to create a sticky, caramel-like base that will hold the bars together. Once boiling, remove the pan from heat and stir in the creamy peanut butter until smooth. The peanut butter infuses the mix with a luscious nutty flavor and adds richness to the texture.
Step 2: Combine with Rice Krispies
Pour the 6 cups of gluten-free rice krispie cereal into the peanut butter and syrup mixture. Stir thoroughly to ensure every crispy piece is coated. This step is key to achieving that iconic crunch combined with chewy softness. The cereal’s light texture contrasts beautifully with the dense peanut butter layer, making each bite delightful and balanced.
Step 3: Press Into the Pan
Transfer the peanut butter rice krispie mixture into a greased 9 x 13-inch pan. Use a spatula or the back of a spoon to press the mixture evenly and firmly into the pan. Firm pressing is important—it helps the bars hold their shape when cutting and ensures you get a uniform texture throughout.
Step 4: Add the Chocolate Topping
Melt the Enjoy Life semi-sweet chocolate chips carefully, either in the microwave in short bursts or on the stovetop over low heat while stirring constantly. Once melted, spread the chocolate evenly over the top of the pressed cereal mixture. This luscious chocolate layer adds a beautiful glossy finish and that classic sweet touch that makes Oh Henry Bars absolutely irresistible.
Step 5: Let Set and Cut
Allow the chocolate to set fully at room temperature or in the fridge. Once firm, cut the bars into squares or rectangles. This final step transforms your homemade creation into handy portions perfect for sharing or packing in a lunchbox.
How to Serve Oh Henry Bars
Garnishes
For an extra special touch, sprinkle chopped nuts like peanuts, almonds, or walnuts on top of the melted chocolate before it sets. This adds a fresh crunch and enhances the nutty flavors in the bars.
Side Dishes
Oh Henry Bars shine best when enjoyed alongside a cold glass of milk or a warm cup of coffee. The creamy beverage complements the chewy texture and rich flavors perfectly without overwhelming the palate.
Creative Ways to Present
Looking to impress guests? Serve Oh Henry Bars on a decorative platter with a dusting of cocoa powder or sea salt flakes on top of the chocolate for a gourmet twist. You can also stack smaller bars with parchment paper in between and package them beautifully as homemade gifts.
Make Ahead and Storage
Storing Leftovers
Keep your Oh Henry Bars fresh by storing them in an airtight container at room temperature. They stay delicious and chewy for up to 5 days, making them perfect for a quick snack throughout the week.
Freezing
If you want to make these bars in advance, wrap them tightly in plastic wrap and place in a freezer-safe container. They freeze wonderfully and can be stored for up to 2 months. Just thaw at room temperature before serving.
Reheating
To enjoy the bars warm, microwave an individual piece for about 10-15 seconds. This softens the chocolate and peanut butter slightly, enhancing their gooey goodness without compromising the crunch.
FAQs
Can I use crunchy peanut butter instead of creamy?
Absolutely! Using crunchy peanut butter will add extra texture and nutty bursts, making your Oh Henry Bars even more exciting to eat. Just be sure to stir well to incorporate it evenly.
Is it necessary to use gluten-free rice krispies?
If you have no gluten sensitivity, regular rice krispie cereal works just fine. However, for those avoiding gluten, the gluten-free option ensures everyone can enjoy these bars without worry.
Can I substitute the semi-sweet chocolate chips with dark chocolate?
Yes, dark chocolate is a fantastic alternative if you want a richer and slightly less sweet top layer. Just make sure to melt it gently to preserve its smooth texture.
How do I prevent the peanut butter layer from being too sticky?
Be sure to heat the sugar and syrup to a proper boil and mix it thoroughly with the peanut butter. Pressing the mixture firmly into the pan also helps it set well and reduces stickiness.
Can I add other ingredients to customize my Oh Henry Bars?
Definitely! Feel free to mix in chopped nuts, dried fruit, or even mini chocolate chips into the rice krispie mixture before pressing it into the pan for your own signature twist.
Final Thoughts
Making Oh Henry Bars at home is a delightful way to recreate a classic favorite with your own special touch. These bars are simple, fun, and packed with the kind of rich, crunchy, and chewy flavors that bring smiles every time. I can’t wait for you to try this recipe and discover just how easy it is to bring this beloved treat into your kitchen. Happy baking and even happier snacking!
PrintOh Henry Bars Recipe

These Oh Henry Bars are a delightful gluten-free treat combining a crispy peanut butter rice krispie base topped with rich Enjoy Life semi-sweet chocolate. Perfect for satisfying your sweet tooth with a crunchy, nutty flavor and a smooth chocolate layer. Made with allergen-conscious ingredients, these bars are ideal for those seeking gluten-free and vegetarian snacks.
- Prep Time: 10 minutes
- Cook Time: 10 minutes
- Total Time: 20 minutes
- Yield: 24 bars 1x
- Category: Dessert, Snack
- Method: No-Bake, Stovetop
- Cuisine: American
- Diet: Gluten Free
Ingredients
Base Ingredients
- ¾ cup granulated sugar
- 1 cup white Karo syrup
- 1 cup creamy peanut butter
- 6 cups gluten free rice krispie cereal
Chocolate Topping
- 20 ounces Enjoy Life semi-sweet chocolate chips (2 – 10 ounce bags)
- Optional: chopped nuts for sprinkling on top
Instructions
- Prepare the syrup mixture: In a saucepan, heat the granulated sugar and white Karo syrup over medium heat until it reaches a boil. Remove the pan from heat and immediately add the creamy peanut butter. Stir well until the mixture is smooth and fully combined.
- Combine with cereal: Pour the 6 cups of gluten free rice krispie cereal into the peanut butter syrup mixture while it’s still warm. Stir thoroughly to ensure the cereal is evenly coated with the peanut butter mixture.
- Press into pan: Transfer the peanut butter and cereal mix into a greased or lined 9 x 13 inch pan. Press the mixture firmly and evenly into the pan to create a solid base layer.
- Melt chocolate topping: Melt the Enjoy Life semi-sweet chocolate chips in a microwave-safe bowl using short bursts of 20-30 seconds, stirring between each interval, or melt over low heat on the stovetop, stirring often to prevent burning. Once melted, evenly spread the chocolate over the peanut butter rice krispie mixture in the pan.
- Set and slice: Allow the chocolate to set completely at room temperature or place the pan in the refrigerator to speed up the process. Once the chocolate is firm, cut the mixture into bars of your desired size.
- Store and serve: For best taste and texture, enjoy the bars the same day. Store any leftovers in an airtight container for up to 5 days to maintain freshness.
- Optional garnish: Before the chocolate sets, sprinkle chopped nuts on top for added texture and flavor.
Notes
- Use gluten free certified rice krispie cereal to maintain the recipe’s gluten free status.
- If you prefer a different nut butter, creamy almond butter could be a substitute but may alter texture and taste.
- The bars are best consumed within 1 day but can be safely stored for up to 5 days in an airtight container.
- Melting chocolate chips slowly and stirring frequently prevents burning and ensures smooth spreading.
- Adding chopped nuts on top is optional but adds a nice crunch and visual appeal.
- Use Enjoy Life brand chocolate chips for a dairy-free, allergen-safe choice.
Nutrition
- Serving Size: 1 bar (based on 24 servings)
- Calories: 190
- Sugar: 12g
- Sodium: 90mg
- Fat: 10g
- Saturated Fat: 3.5g
- Unsaturated Fat: 6g
- Trans Fat: 0g
- Carbohydrates: 22g
- Fiber: 2g
- Protein: 4g
- Cholesterol: 0mg
Keywords: Oh Henry Bars, gluten free dessert, peanut butter bars, no bake bars, rice krispie bars, allergen friendly, Enjoy Life chocolate bars