Strawberry Crunch Brownies Recipe
Introduction
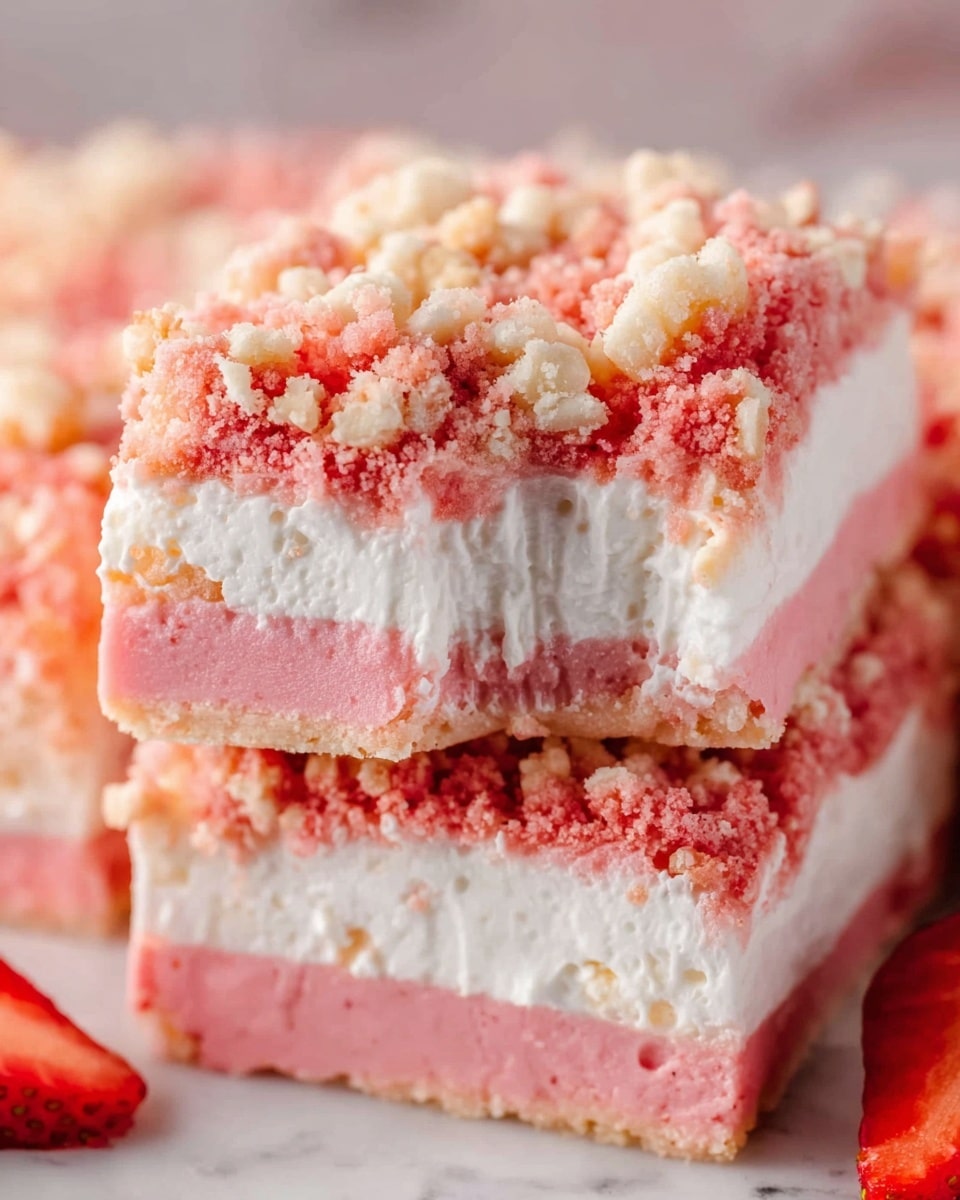
Strawberry Crunch Brownies offer a delightful twist on traditional brownies with a fruity cake base, creamy frosting, and a crunchy cookie topping. Perfect for summer gatherings or anytime you want a sweet treat with a bit of texture and fresh strawberry flavor.

Ingredients
- 1 (15.25 ounce) box strawberry cake mix
- 1 large egg
- ½ cup (1 stick) salted butter, melted
- 3 tablespoons heavy cream
- 1 cup white chocolate chips
- 1 (8 ounces) package cream cheese, room temperature
- ⅓ cup powdered sugar
- ⅓ cup sour cream
- 1 teaspoon vanilla extract
- 1 (8-ounce) tub whipped topping
- 36 vanilla sandwich cookies
- ¼ cup strawberry syrup
- Fresh strawberries, optional garnish
Instructions
- Step 1: Gather all of the ingredients.
- Step 2: Preheat the oven to 350 degrees Fahrenheit and lightly grease a 9×13-inch baking dish with baking spray.
- Step 3: In a medium-sized mixing bowl, combine the cake mix, egg, melted butter, and heavy cream until smooth and combined.
- Step 4: Fold in the white chocolate chips and then spread the mixture into an even layer in the prepared baking pan.
- Step 5: Bake for 18–23 minutes or until a toothpick inserted in the center comes out clean and the edges are golden brown.
- Step 6: Allow the brownies to cool to room temperature.
- Step 7: In a large mixing bowl, beat the cream cheese and powdered sugar with a hand or stand mixer until smooth and fluffy.
- Step 8: Beat in the sour cream and vanilla extract until combined.
- Step 9: Lightly fold the whipped topping and spread the mixture over the cooled brownies.
- Step 10: Place the sandwich cookies in a food processor and pulse several times until roughly crumbled but not completely crushed.
- Step 11: Add the strawberry syrup and pulse until the cookies are evenly coated and slightly pink.
- Step 12: Sprinkle the cookie mixture over the top of the brownies, cut into squares, and serve or chill until ready to serve. Garnish with fresh strawberries if desired.
Tips & Variations
- For a dairy-free version, substitute cream cheese and sour cream with vegan alternatives and use dairy-free whipped topping.
- If you don’t have a food processor, place the sandwich cookies in a sealed bag and crush them with a rolling pin.
- Add a handful of chopped nuts to the brownie batter for extra crunch inside.
- Use fresh strawberry syrup or jam for a more natural flavor in the topping.
Storage
Store the brownies in an airtight container in the refrigerator for up to 4 days. Allow them to come to room temperature before serving for the best texture. You can also freeze uncut brownies for up to 2 months; thaw in the fridge overnight before frosting and serving.
How to Serve
Serve this delicious recipe with your favorite sides.
FAQs
Can I use a different cake mix flavor?
Yes, you can substitute the strawberry cake mix with another flavor like vanilla or red velvet, but it will change the overall taste. Strawberry mix gives the most authentic fruit flavor.
Do I have to use white chocolate chips?
White chocolate chips add a sweet, creamy touch, but you can omit them or replace with regular chocolate chips if preferred.
PrintStrawberry Crunch Brownies Recipe

Strawberry Crunch Brownies combine a moist strawberry cake-based brownie layer with a creamy, tangy frosting and a crunchy, strawberry-coated vanilla cookie topping. This delightful dessert offers a unique twist on traditional brownies with a blend of fruity, creamy, and crunchy textures, perfect for any occasion.
- Prep Time: 15 minutes
- Cook Time: 20 minutes
- Total Time: 35 minutes
- Yield: 12–16 servings 1x
- Category: Dessert
- Method: Baking
- Cuisine: American
Ingredients
Brownie Layer
- 1 (15.25 ounce) box strawberry cake mix
- 1 large egg
- ½ cup (1 stick) salted butter, melted
- 3 tablespoons heavy cream
- 1 cup white chocolate chips
Frosting Layer
- 1 (8 ounces) package cream cheese, room temperature
- ⅓ cup powdered sugar
- ⅓ cup sour cream
- 1 teaspoon vanilla extract
- 1 (8-ounce) tub whipped topping
Topping
- 36 vanilla sandwich cookies
- ¼ cup strawberry syrup
- Fresh strawberries, optional garnish
Instructions
- Gather Ingredients: Collect all ingredients needed for the brownie layer, frosting, and topping to ensure a smooth cooking process.
- Preheat Oven and Prepare Pan: Preheat your oven to 350°F (175°C). Lightly grease a 9×13-inch baking dish with baking spray to prevent sticking.
- Mix Brownie Batter: In a medium mixing bowl, combine the strawberry cake mix, egg, melted butter, and heavy cream. Stir until the batter is smooth and fully combined.
- Add White Chocolate Chips: Gently fold in the white chocolate chips to incorporate them evenly throughout the batter.
- Bake Brownies: Pour the batter into the prepared baking dish, spreading it evenly. Bake for 18-23 minutes, or until a toothpick inserted in the center comes out clean and the edges turn golden brown.
- Cool Brownies: Allow the brownies to cool completely to room temperature before adding the frosting to prevent melting.
- Prepare Frosting: In a large bowl, beat the cream cheese and powdered sugar with a hand or stand mixer until the mixture is smooth and fluffy.
- Combine Frosting Ingredients: Beat in the sour cream and vanilla extract until the frosting is well combined and creamy.
- Fold in Whipped Topping: Gently fold the whipped topping into the cream cheese mixture to create a light, airy frosting. Spread this evenly over the cooled brownies.
- Process Cookies for Topping: Place the vanilla sandwich cookies in a food processor and pulse several times until roughly crumbled but still textured.
- Coat Cookies with Strawberry Syrup: Add the strawberry syrup to the cookie crumbs and pulse until they are evenly coated and have a soft pink hue.
- Add Topping and Serve: Sprinkle the strawberry-coated cookie crumbs over the frosted brownies. Cut into squares and serve immediately, or chill until ready to serve. Optionally, garnish with fresh strawberries for an extra fresh touch.
Notes
- Ensure brownies are completely cooled before frosting to prevent melting.
- You can substitute the strawberry syrup with homemade strawberry sauce for an extra fresh flavor.
- For a dairy-free version, use dairy-free cream cheese and whipped topping alternatives.
- Storage: Store leftovers covered in the refrigerator for up to 3 days.
- For added texture, consider sprinkling chopped nuts on the topping layer.
Keywords: Strawberry brownies, strawberry cake mix dessert, creamy frosting brownies, crunchy cookie topping, white chocolate chip brownies